
User:Miya/CentralNotice


- CentralNotice/Usage guidelines
- CentralNotice/Banner guidelines
- Special:NoticeTemplate
- Special:CentralNoticeBanners/edit/banner_template_2015 "Clone" button
- Images must be protected.
- Special:CentralNoticeBanners/edit/POTY_2014_R1(Preview on-wiki)
- Special:CentralNoticeBanners/edit/poty2010_round2 (Preview on-wiki)
POTY_2015_R1
| CentralNoticeを使う前に、このページの内容を良く理解しなくてはなりません。 Special:CentralNoticeへの変更は全ウィキメディアに影響するため、しようとしていることをしっかり理解したうえで細心の注意を払って行ってください。 |
CentralNotice は、アナウンスを(通常はバナーの形で)ウィキメディアの諸ウィキに届けるMediaWikiの拡張機能です。寄付募集チームが寄付を呼びかけたり、ウィキメディアのコミュニティや利用者の興味があるアナウンスをしたりすることに多く使われています。CentralNotice は国、言語、プロジェクト、デバイス、ログインの有無別に通知先を設定できます。
このページではCentralNoticeキャンペーンとバナーの作り方と設定の仕方を解説します。 開発者向けの情報やCentralNoticeをあなたのウィキにインストールする方法については、MediawikiのExtension:CentralNoticeをご覧ください。ウィキメディアのクラスタでのCentralNoticeのセットアップ方法については、WikitechのCentralNoticeをご覧ください。
| この文書の一部は情報が古かったりかなりの手直しが必要かもしれません。 (May, 2015) |
CentralNoticeにより表示されるアナウンスは、広く翻訳されます、コミュニティ全体に関わる事柄ーたとえば、2009年のCC-BY-SA 3.0 へのライセンス移行, 毎年のウィキマニアのイベント、2009 年の戦略計画イニシアチブなとーについては特にそうです。このシステムはまた、寄付の募集やコンテンツに焦点をおくWiki Loves Monumentsのようなキャンペーンにも利用されます。
CentralNotice admin は、CentralNoticeバナーとキャンペーンの作成に用いられるインターフェイスです。 CentralNotice adminがどう作動するか、それをどう用いるかが、このページの主題です。CentralNotice adminは、Special:CentralNotice にあり、メタの管理者もしくは central notice管理者にしか使えません。
2015年9月のCentralNoticeのバージョンアップ以降のキャンペーンとバナーの情報については、こちらの文書をご覧ください。
キャンペーン[edit]
バナーを表示させるために、あなたはキャンペーンを制作しなくてはなりません。 キャンペーンは、どの国、言語版、ウィキメディアプロジェクトに一連のバナーを一定期間表示させるか、きめ細かいコントロールを可能とします。具体的には、キャンペーンは以下の機能を持ちます:
- Enabled(有効化): チェックを入れると、キャンペーンはバナーを表示するのに用いられます。
- Start date/time(開始日時): UTCで、もしキャンペーンがEnabled になれば、 バナーが表示され始めます。
- End date/time(終了日時): UTCでこの時間になると、バナーは表示を止めます。
- Priority(優先順位): 複数のキャンペーンが同じ対象(プロジェクト、言語, 国, and 利用者の状態 (ログインの有無)をターゲットにした場合、どのキャンペーンが表示されるかを優先順位が決定します。優先順位の低いキャンペーンは表示されません;しかし、もし同じレベルのキャンペーンが二つ以上重なった場合は、バナーの重要性が結合されて割り当てが配分されます。 'バナーの重要性' の詳細については下をご覧ください。
- Projects(プロジェクト): 選択したウィキメディア・プロジェクトにだけバナーが表示されます。
- Languages(言語): 選択した言語版にだけバナーが表示されます。
- たとえばProjects を'wikipedia'、言語を 'es' とすれば、スペイン語版ウィキペディアの閲覧者だけがバナーを見ることになります。
- Top 10 Languages(上位10言語版) のリンクなら、ウィキメディアが提供する上位10の言語版を選択します。
- Geotargeted(地域特定): オプション 選択した地域/国の利用者のみがバナーを見ます。
- バナーを選択するには、'Geotargeted' のチェックボックスを選択しなければなりません。
- Geotargetedは正確ではなく、利用者の国を間違って認識してしまうことや、そもそも地域を特定できないことももあります。Geotargetedが全くできない場合は、以下の国々が対象になります:
| Country Code | Name | Description |
|---|---|---|
| XX | Unknown/Non-Geolocatable | Given when the data could not be processed or information simply does not exist. |
| A1 | Unknown/Anonymous Proxy | Given when the user is accessing Wikimedia sites through a known anonomizing service. |
| A2 | Unknown/Satellite Provider | Given when the user is accessing Wikimedia sites via a satellite connection. |
| O1 | Unknown/Other | Given in very rare cases when information exists, but not in sufficient quantity to determine a location. |
| EU | Unknown/European Union Region | Given in cases where a user could not be narrowed geographically down any further than the EU. |
| AP | Unknown/Asia Pacific Region | Given in cases where a user could not be narrowed geographically down any further than somewhere in the Asia Pacific region. |
- Bucketing(バケツ): オプション 後述の#Targeting with Bucketsを参照。
- Locked(ロック): ロックされたキャンペーンでは、ロックを解除しない限りどの要素も変更できません。
- Archived(アーカイヴ): アーカイヴされたキャンペーンはバナーを表示できません。キャンペーンのリストにもデフォルトでは表示されません。また(ロックされたキャンペーンと同じように)アーカイヴされたキャンペーンでは(アーカイヴ解除されない限り)どの要素も変更できません。
- Limit traffic(トラフィックの制限): [TODO]
キャンペーンの運用[edit]
Special:CentralNotice、では、現在利用されているキャンペーンのリストとともに表示されます?( one is immediately presented with a list of campaigns currently in use.)緑でハイライトされているキャンペーンは現在有効なものです。同一のウィキに複数のキャンペーンが予定される状況では、キャンペーンの優先順位 (above 参照) により表示されるキャンペーンが決定されます。キャンペーンを取り除きたかったら、"Archive"を選択してください。変更を加えおわったら、リスト下部の "Submit" をクリックします。

Each item above links to a page containing details about a given campaign.
キャンペーンの編集[edit]
特定のキャンペーンの名前をクリックしたら、そのキャンペーンの設定すべてーたとえば開始日時と終了日時、対象とするウィキ、などーを含むページが表示されます。キャンペーンの編集しおわったら、ページ下部の"Submit"をクリックしてください。
下のキャンペーンはすべてのプロジェクト、すべての言語版、フランス地域のみを対象としています。有効化され通常の優先順位です。

新しいキャンペーンを作る[edit]
新しいキャンペーンを作るには、 Special:CentralNotice の最下部までスクロールして、底に表示されたフォームに記入してください。
バナー[edit]
それぞれのキャンペーンにはバナーが指定されます。実際にメッセージの文章を運ぶのがバナーで、バナーの主題カテゴリーがキャンペーンです。たとえば、2008-2009年の寄付募集、the "fundraiser_all_projects" campaign にはさまざまな "please donate(寄付をお願いします)"や "personal appeal from Jimmy Wales(ジミー・ウェールズからのお願い)" といったバナーが属し、それぞれがことなるメッセージを含んでいます:


今は、この寄付募集は終了しているので、fundraiser_all_projectsには寄付募集後の感謝メッセージ、ジミー・ウェールズからの"thank you"の言葉だけが割り当てられています:

バナーのリンクをクリックすると、他のページに導かれ、そこでバナーを編集したり、メッセージ文章の翻訳を追加したりできます。2008_jimmy_thank_you_b では、プレビューの直下に下記が表示されます:
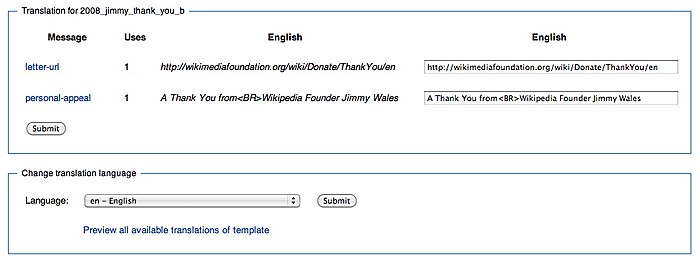

- [TODO: outdated image]


"letter-url" と"personal-appeal" から メッセージ文章が格納されているMediaWiki空間のページへのリンク:
MediaWiki:Centralnotice-2008 jimmy thank you b-letter-url と MediaWiki:Centralnotice-2008 jimmy thank you b-personal-appeal は、それぞれ英語の翻訳があります。
ここの文章を変更することは、自動的に対応したMeidaWikiページを編集することになります。"Change translation language".の下にあるドロップダウンメニューから言語を選ぶことで、メッセージ文章の新しい翻訳を挿入できます。非英語の言語 qqq によるテンプレート ttt の中のメッセージ文章 mmm のMeidaWikiページは
MediaWiki:Centralnotice-ttt-mmm/qqq にあります。たとえば、"2008 jimmy thank you b" のなかの "personal-appeal" 要素のロシア語 (ru) 翻訳のMeidaWikiページは MediaWiki:Centralnotice-2008 jimmy thank you b-personal-appeal/ru にあります。
言語選択のしたには、バナーの設定があります。これによって、バナーが誰に表示されるかーIP利用者か、ログイン利用者か、その両方かー決められます。
「This is a fundraising banner」 により、複数ページに均一のウェイトでランダムにリンクされます。 このオプションを有効にしたときは、バナーが LandingCheck を通るよう強制されます。LandingCheck は、ローカライズされ特定地域に向けられたページへの誘導を容易にします。これはGeoLite 拡張機能の後継として作成されました。[TODO: outdated instructions]
It requires a base landing page which, when the LP is called, the extension checks to see if a version of the landing page exists for the user's language and country. If not, it looks for a version localized for the user's language. If that doesn't exist either, it looks for the English version. If any of those exist, it then redirects the user. An exception to these rules is when the user comes from a country that handles its own fundraising:
- Germany (DE)
- Switzerland (CH)
In these instances, the language/COUNTRY system is switched to COUNTRY/language with the corresponding priorities switched as well. The banner enables tracking of banners/campaigns/landing pages through the use of utm url data. [TODO: check accuracy]
Further down, we see the raw code for 2008_jimmy_thank_you_b – its look, colour, size, and formatting, and where the message snippets ("letter-url" and "personal-appeal") are located. It is inadvisable to edit the text in this box without purpose and without having a good knowledge of CSS.

If we wish to assign more banners to "fundraiser_all_projects" campaign, we can return to the campaign's main page, tick "Add" for the banners we want under "Available banners", and click submit at the bottom of the page.
- Bottom of page


If we wish to create an entirely new banner, we go to the top of Special:CentralNotice, click "Banners", scroll to the bottom, and click "Add a banner":
- Banners selected: Special:CentralNotice
- Banners selected: Special:NoticeTemplate
- Bottom of Special:NoticeTemplate


From Special:NoticeTemplate, we are also able to view, click on, and remove all banners currently available.
[TODO: document mixins and device targeting]
特定利用者層を対象とする[edit]
You can target a banner to logged-in users, anonymous users, or both. To do so, select the checkbox for each group in the banner editing interface.
You can use mw.config.get( 'wgUserEditCount' ) to retrieve the edit count of the current user and mw.config.get( 'wgUserGroups' ) to get the user groups a user is in.
バケツ(?)で対象分け[edit]
Buckets are another way to divide users into groups and send different banners to each group. They can be useful in A/B testing. For example, if you configure a campaign to have two buckets, and set a different banner for each bucket, then users will only see one banner or another, based on a random bucket assignment made by CentralNotice's JavaScript and stored in a cookie.
If a campaign is unbucketed, all users can receive the banners regardless of their bucket assignment.
Note that this automatic assignment can only choose the first two buckets, A and B. Buckets C and D can only be assigned programmatically from ad-hoc JavaScript code. However, this is recommended only in special cases.
限定的な閲覧[edit]
It is possible (and polite!) to limit the number of times a banner shows up for a particular user. Add a style="display: none;" attribute to the banner element, and then you can use the following predefined code to only show up to a certain number of times. views-cookie-name should be something unique, usually involving your banner or campaign name.
<script>
{{MediaWiki:CentralNotice/Resources/MaxViews.js
| views-cookie-name = centralnotice_bannercount_inspire2015
| max-views         = 5
}}

$(document).ready(function() {

    if (!mw.centralNotice.bannerData.hideResult) {
        $('#{{{banner}}}').show();
    }

});
</script>
バナーをデザインする[edit]
Central Notice banners are composed of five different pieces:
- CSS
- JavaScript
- HTML
- Images
- MediaWiki messages (for localization)
CSS[edit]
When setting up any new banner it is vital that whatever CSS is used is isolated to just that banner. For instance B_1021_US1_Jimmy is an excellent example of good isolation. All of its css is prefaced with the specific identifier #B_1021_US1_Jimmy which corresponds to the id of the banner div.
Examples of bad banner css are selectors like a and div which would affect all text within the body of the page.
Since the z-index for the drop-down search suggestions is 1099, make sure that none of the elements in your banner have a z-index higher than that. Typically, banner elements are given z-indexes of 100 or less.
JavaScript[edit]
Some banners feature a custom set of JS for added functionality. 2009_Notice30 is an example of one that has an added goToDonationPage function which allows the destinaton url to be further randomized without the need for multiple banners.
閉じるボタン[edit]
Since the ability to dismiss a banner is core to the functionality of CentralNotice, the JavaScript code for it is located within the extension itself.
Since April 2014, it's also possible for a banner to dismissed on all wikis at once, so that users visiting multiple wikis don't have to dismiss it hundreds times.
Making a call to hideBanner() will hide the centralNotice div and set a cookie to hide subsequent banners of the same type for two weeks. This function can be inserted automatically by clicking on the 'Insert close button' link in the banner editing interface. The cookie for hiding banners only hides banners that are in the same banner group as the one that hideBanner() was called from. Currently there are two banner groups: fundraising and default. To put a banner in the fundraising group, check the checkbox that says "This is a fundraising banner".
document.write() の利用は非推奨[edit]
Because CentralNotice banners are often not written into the page until after the page has finished loading, document.write() or document.writeln() statements within banners will sometimes overwrite the entire page rather than just inserting content within the page. To avoid this problem, insert dynamic content using the DOM rather than document.write().
For example, instead of doing:
Hello <script type="text/javascript">document.write( mw.config.get( 'wgUserName' ) );</script>!
Welcome to <script type="text/javascript">document.write( mw.config.get( 'wgSiteName' ) );</script>.
Use DOM insertion instead:
Hello <span id="cn-username"></span>! Welcome to <span id="cn-sitename"></span>.
<script type="text/javascript">
$('#cn-username').prepend(mw.config.get( 'wgUserName' ));
$('#cn-sitename').prepend(mw.config.get( 'wgSiteName' ));
</script>
HTML[edit]
When creating the actual structure of the banner, pay particular attention to keeping the design as simple as possible. Design them as if it was 1998 and use the lowest amount of complexity possible. 2009_Notice31 is a good example of very simple layout. All items are controlled through their own divs to allow for maximum customization while keeping the HTML simple.
画像[edit]
When using images in CSS or raw <img> tags, do not use a full URL like http://upload.wikimedia.org/... -- your banners will be loaded over HTTPS for users on the secure interfaces, and this can cause a warning message to display in some browsers.
Instead use the protocol-relative URL form like //upload.wikimedia.org/... instead; this will let the browser select HTTP or HTTPS as appropriate.
 #mobileSurvey2011-logo {
   position: absolute;
   top: 20px;
   left: 25px;
   background-image: url(//upload.wikimedia.org/wikipedia/commons/thumb/1/12/Wikimedia_logo_text_RGB.svg/60px-Wikimedia_logo_text_RGB.svg.png);
   height: 60px;
   width: 60px;
   background-repeat: no-repeat;
 }
MediaWikiメッセージ[edit]
We utilize triple bracket mediawiki messages in order to allow for translations. In order to add a new message you simply add:
{{{varname}}}
and after the form submission you will see the new message show up in the template translation window. To add a new language translations change the language option under Language to the desired setting and add the new translation.
[edit]
A convenient reuse available in the system is the ability to re-use messages from other banners. This allows us to not have to re-input the exact same message set that a collection of banners might use. An example would be:
{{int:Centralnotice-2009_Notice1-donate-text2}}
What this means is that we are pulling the donate-text2 variable from the 2009_Notice1 banner and re-using its content. This is very helpful when you have multiple banners all needing to point to one url. By keeping it set on one banner you only have to change it in one place.
Many commonly used messages are available from the shared banner.
Magic messages[edit]
You can use the magic message {{{campaign}}} to insert the name of the campaign, or the magic message {{{banner}}} to insert the name of the banner. Neither of these require translation.
新しいバナーを作る[edit]
If one is lucky then the banner you are trying to add already has a close approximate in the system. Copy the existing body into a new banner by following the link at the bottom of the Banners tab labeled 'Add a new banner' . Add the appropriate new messaging and load the inline preview to validate that all is well.
Note: Do not try to clone the banner via the "Create a copy of the banner" option, this is not what you want. That duplicates the banner entirely, including all of the translations.
翻訳[edit]
New Translation System -- Stand in documentation
品質テスト[edit]
キャンペーン[edit]
You can simulate loading a wiki page from any country (to test campaign geotargeting) by adding ?country=<countrycode> to the end of the URL. (Use the 2-letter ISO 3166-1 code.)
バナー[edit]
Once a banner is configured in the CentralNotice system it is up to the editor to make sure it looks correct across all of our supported browsers. There are currently four steps to verify a banner:
- After saving your html/css/js, use the inline preview to verify that the content is as it should be.
- If the inline preview looks OK, then select the option labeled Preview all available translations of banner. If you have any translations other then English you should see them now. Pay close attention to spacing and text that is too long and either adjust the messaging or html/css to accommodate it as best as possible.
- Next, go to the Main Page of one of the wikis that you are going to run the banner on. Add
?banner=<bannername>to the end of the URL and reload. You should then be able to see the banner as it will appear when it goes live. Because there are local CSS quirks on every wiki, you may want to test the banner on all of the high-traffic wikis that you are going to run the banner on. It is also important to test on multiple browsers as we have a diverse set of users who use ie6+, firefox2+ and many others. - If all has gone well, you're likely ready to push it into production. Please clear the messaging that is used on the banner with the respective communities before enabling anything. Having gotten approval, add your banner to the correct campaign and load it on the wiki in question. You may need to do a hard refresh to see the new banner since the banner list is cached.
Do not rely on the NoticeTemplate view to be an accurate representation of the banner. The only way to see a completely accurate preview is use ?banner=<bannername>
Specific tips[edit]
一般[edit]
- Link to a page to translate the banner, it's best to have that be a subpage of CentralNotice (see the others for examples).
- However, if this banner is being shown to all users, it's best to omit that link. (Vandalism frequently occurs in these cases, and we don't want bad words showing at the top of all of our wikis.)
- Links are necessary, but remember that we can't use wikitext, so be sure to use <a href= instead.
選挙[edit]
- Don't link directly to the voting page, link to some page explaining the vote first. Otherwise, people are more likely to be confused and just vote without knowing what they're voting for.
- If possible, try to restrict the campaign to only show to people it relates to (see example js).
関連ページ[edit]
- CentralNotice – A translation landing page for current CentralNotices.
Links to other help pages
- Help contents
- Meta · Wikinews · Wikipedia · Wikiquote · Wiktionary · Commons: · Wikidata · MediaWiki · Wikibooks · Wikisource · MediaWiki: Manual · Google
- Versions of this help page (for other languages see further)
- What links here on Meta or from Meta · Wikipedia · MediaWiki
- Reading
- Go · Search · Namespace · Page name · Section · Backlinks · Redirect · Category · Image page · Special pages · Printable version
- Tracking changes
- Recent changes (enhanced) | Related changes · Watching pages · Diff · Page history · Edit summary · User contributions · Minor edit · Patrolled edit
- Logging in and preferences
- Logging in · Preferences
- Editing
- Starting a new page · Advanced editing · Editing FAQ · Export · Import · Shortcuts · Edit conflict · Page size
- Referencing
- Links · URL · Interwiki linking · Footnotes
- Style and formatting
- Wikitext examples · CSS · Reference card · HTML in wikitext · Formula · Lists · Table · Sorting · Colors · Images and file uploads
- Fixing mistakes
- Show preview · Reverting edits
- Advanced functioning
- Expansion · Template · Advanced templates · Parser function · Parameter default · Magic words · System message · Substitution · Array · Calculation · Transclusion
- Others
- Special characters · Renaming (moving) a page · Preparing a page for translation · Talk page · Signatures · Sandbox · Legal issues for editors
[[Category:Meta-Wiki]]
 [[Category:CentralNotices|*]]