Explore the FNF toolkit for the 2024 edition of Feminism and Folklore! This powerful toolkit, developed after extensive feedback from users over the past five years, is the result of a mutual partnership between Project Korikath and the Wiki Loves Folklore Team, created by Nokib Sarkar. The toolkit has two tools for now, one is designed to bridge content gaps by identifying articles in the English Wikipedia that are absent from your native language Wikipedia, and another one is to serve as a one stop solution to host the Feminism and Folklore (and other) campaigns.
For now, the toolkit has two tools (Article list generator by topic and Campwiz) and the number will hopefully increase over time if the Feminism and Folklore community express the need of new tools.
This tool requires logging in using your Wikimedia account. You can view only the homepage of the toolkit when logged out. Remember that you'll have to login only once for both of the tools in the wlf toolkit. You can login from the toolkit homepage, or either of the tool homepage. Once you're logged in, your screen should look like the following screenshots.
Loged out screen on the toolkit
Logged out screen from the toolkit homepage
Logged out page from the "Article List Generator by Topic" tool's homepage
Logged out page from the "CampWiz" tool's homepage
If you are logging in for the first time, you'll see the page as shown in the following screenshot. Click on the blue "Allow" button. You don't have to provide permission this way after your first log in, clicking the login button once will log you in directly.
You should be now logged in. Once you're logged in, your screen should look like the following screenshots.
Loged in screen on the toolkit
Logged in screen from the toolkit homepage
Logged in page from the "Article List Generator by Topic" tool's homepage
Click on the blue "Launch" button below the "Article List Generator by Topic" tool's section in the toolkit homepage or follow this link directly to launch the tool. The homepage should look like the following screenshot.
You should familiarize yourself with the tool's home screen. At the top left of your screen, you should find a menu icon, which will lead you to "Navigation Menu" upon click (as shown in the screenshot at the right). "Home" option will lead you to the toolkit's homepage. The "Task" option will lead you to a page where you'll find your previously generated article lists, the page will be blank if you didn't use the tool before. You can do the same task by clicking on the red "List Tasks" button on the home page of the tool. The "Settings" option will lead you to user settings page which currently don't have any active functionality, we'll work on this in our future updates.
To start creating an article list, click the blue "Add Task" button from the tool's homepage. You'll see a new page that should look like the following screenshot.
Select your country and target language wiki from the drop down menu. You can also add additional category using the "Add additional category" field at the bottom of the page. For example, in the screenshot attached to the right of this text, I have selected Bangladesh as the country name, and Bengali Wikipedia as the target wiki. You can click on the green branch icon at the right of every category add its subcategory in the list. You can also click the green "Add Subcategories" button at the top of the page to add subcategories of all the selected categories at once. You can click the red "Remove Subcategories" button to remove the selected categories. I have selected all the categories for Bangladesh and didn't select any subcategory.
Once putting all the inputs is done, click the green "Generate" button at the top right of the page. It will take some time to generate the list, you'll be able to watch the live update on the screen as shown below. While the tool is in the middle of the process of list generation, you can exit the tab if you want. Your list generation task will continue and will be saved in the "List Task" page. You'll also find a screenshot of the screen when the tool is done with preparing the list. You'll get translations of the titles of the articles in the target language beside every article in the list. The translation is a raw suggestion from google translate, you can change the suggested translation when you start creating the page. Clicking the blue plus button will prompt you to create the article in the target wiki, clicking the language icon will lead you to content translation of of that specific article. You'll get the a wikitable of the generated list by clicking the blue "Wiki" button, you can copy paste it in your target wiki. Also, the blue "CSV" button will download the table in csv format.
In the "List task" page, you'll be able to watch all your previously generated lists. You can download the lists in csv from there. You can also click on the pagepile id to get the previously generated list again from the "Pagepile" tool.
Stages of the list generation process
Loading screen when the tool is generating the list
Screen when the preparation of the list is completed
You can change the suggested translation when you start creating the page
Your previously generated lists can be found on the "List Task" page!
The homepage of Campwiz will show all the running and scheduled campaigns as a default. You can filter that list using "Language" and "Status" drop down menu. To start a new campaign, click on the blue "Create New Campaign" button. The CampWiz homepage
The blank details pageThe details page for a sample campaign You'll find a "Detail" page which is the first stage of the four stage campaign creation pathway, you can see the pathway at the top of the "Detail" page. You'll have to select you target wiki, the name of the campaign, start and end date of your campaign. Also, you need to provide a banner image and a short description of your campaign. The start date can be both a past and a future date, past date refers to already running campaigns and a future date will mark the campaign as "Scheduled". Dropping the file name of a wikimedia commons file and clicking on the blue "Fetch" button is enough to add the campaign banner; campaign banners are used in your campaign's homepage on this tool. Once done with these details, click the green "Next" button.
You'll find the "Restrictions" page. Put the minimum number of bites and words you want to allow in your editing campaign. Checking the "Allow users to submit articles that were not created rather expanded" field will allow you to accept expanded articles too. In that case, the participants must add the specified number of bytes AND words to that target article within the specified time. Click Next. The restrictions page
Next is the "Jury" page. Add the username of juries, you'll be added as a jury by default and you can remove your name, but one username must be there as a jury. Check the "Allow jury members to participate in the campaign" and "Prevent jury members from seeing each other's vote" if they fit for you. Click Next.
Next is the "Overview" page. If the details are okay, click "Save". Now you'll have to wait for any of the tool admins to approve the campaign. Note that tool admins are different than Wikipedia admins and Wikipedia admins are not necessarily the tool admins. You'll see a yellow "Pending" stripe on your campaign page until approved.
Once your campaign is approved by a toolkit admin, your campaign page should look like the following. You can share the link to this page with your participants for article submission. The homepage o a running campaign.
You can check all the submissions clicking on the blue "Submissions" button. Your participants need to click on the green "Submit new article" button for a submission. Note that all your participants need to be logged in to submit an article in your campaign.
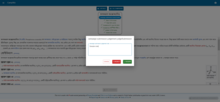
To submit an article, click on the green "Submit new article" button. You'll find the following page. If you're one of the jury members, you can submit on behalf of any participant. Non-jury members can't submit article on behalf of anyone else. The submissions of the campaigns can be found by clicking the blue "Submissions" button on the campaign homepage. The submission pageSample submission on the submission page with a random bnwiki article
If you're in the jury, you'll be able to two some extra icons in the "Submissions" page of the specific campaign. One is to judge the article, another one is to delete the submission. You can find all the submissions in the "All" list. Already evaluated submissions will go to the "Evaluated" list and the rest will go to the "Not Evaluated". Note that the "All" list is public while the other two aren't. "Evaluated" and "Not evaluated" are personalized for jury members, means a jury member will find only those articles in the "Evaluated" list which have been judged from that account. If you want to delete any submission, there will be a confirmation message, and you'll have to wait for 5 seconds before finally clicking the bright red "Delete" button. The "Submissions" pageThe "Delete" confirmation message!
To evaluate an article, click on the blue ballot icon of any submission. That will take you to the judgement page. You can accept or reject an article with a note. The judgement page shows the necessary statistics of the article as well as a full preview of the specific wikipedia article. If you accept the article, the submission will receive one point, no point will be added upon rejection. The judgement page!The final evaluation panel.
You can also find the statistics in the "Statistics" option from the menubar of the tool. You can watch the graph from the statistics for a particular campaign, for a particular user in a campaign, or even for all the campaigns hosted in this tool. The statistics feature is under massive development yet and there are a lot of possibilities.
Once your campaign is ended, the result will be shown in the campaign homepage itself. The result can be exported as csv or pdf. Results are shown on a campaign page after it ends!
Efficient Contribution: Save time and effort by focusing on articles that are yet to be translated into your native language. Streamline your contribution process with targeted and impactful edits. Also, arrange your campaign in one place.
Customization: Customize your selection criteria to align with your language's Wikipedia goals in the article listing tool. Contribute to themes that resonate with your community and enhance the diversity of content. Campwiz provides a wide range of options to organize editing campaigns in your community.
Collaborative Editing: Encourage collaborative editing by sharing the toolkit with fellow editors. Foster a sense of community engagement as you collectively work towards a more inclusive representation of feminism and folklore.
User Feedback: The FNF toolkit has evolved based on extensive feedback from users over the past five years, ensuring it meets the needs and expectations of the Wikimedia community.
Project Korikath and Wiki Loves Folklore Tool: This tool is a collaborative effort of Project Korikath and the Wiki Loves Folklore international Team, created by Nokib Sarkar. The partnership aims to provide editors with a seamless and effective way to identify and contribute missing articles.
Since this is the first edition we are using this tool your feedback matters for its future development. liked using the tool? use the feedback option from the menubar of tool itself, or reach out to us at toolswikilovesfolklore.org
Thank you for contributing to the enrichment of Wikipedia content on feminism and folklore. Your efforts are instrumental in building a more comprehensive and diverse knowledge base.


 Logged out screen from the toolkit homepage
 Logged out page from the "Article List Generator by Topic" tool's homepage
 Logged out page from the "CampWiz" tool's homepage


 Logged in screen from the toolkit homepage
 Logged in page from the "Article List Generator by Topic" tool's homepage
 Logged in page from the "CampWiz" tool's homepage


 Loading screen when the tool is generating the list
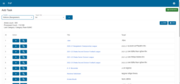 Screen when the preparation of the list is completed
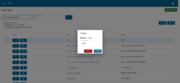 You can change the suggested translation when you start creating the page
 Your previously generated lists can be found on the "List Task" page!