Help:Investigação Especial
Esta página documenta os recursos na nova versão de CheckUser, também conhecida como Especial:Investigar. A ferramenta foi reformulada em 2020, como parte do trabalho da equipe de Anti-Harassment Tools.
Especial:Investigue características
Formulário de entrada:

Especial:Investigar possui uma interface nova e redesenhada que permite que você procure informações de vários usuários/IPs de uma só vez. Você pode fazer isso adicionando mais de um nome de usuário ao campo de entrada. Observe que quanto mais nomes de usuário na lista, mais tempo levará para buscar os resultados, embora deva ser razoavelmente rápido na maioria dos casos.
Guia de informações da conta:

This new tab allows users to be able to quickly see which wikis an account is active on. It also tells you whether an account is blocked on any wiki or holds special permissions. It is essentially the information that you can currently get from CentralAuth but it gives you that information for multiple users which CentralAuth does not at the moment. Note that for IP addresses you will not be able to see any information in this tab.
IPs and user-agents tab:

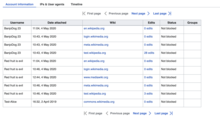
This is the primary tab where you will see all the IP and User-agent information associated with an account. It lists all the users you have specified in the initial form. It contains a table with these columns:
- Nome de usuário: The username of the user being checked.
- IP: IP address of the device the user was active from.
- Agente de usuário: User-agent of the device the user was active from.
- Intervalo de data: Date range of the activity of the user from given IP and user-agent.
The columns on this table will be sortable if there is only one page worth of information. If the data is paginated, the table columns will not sort.
There are a few special things you can do on this page:
1. Highlighting same values across cells


One of the common things we heard from users is that it is important to see how many users have been using the same IP or same user-agent. To make this easier, you can now highlight cells with the same values. To find other records in the table with the same IP or user-agent string, just hover on it and other cells with the same value will automatically highlight. If you move your mouse to a different cell, this highlighting will go away. To keep your highlights sticky, you can use the pin button (![]() ) on the top right of the cell to keep the highlights in place while you scroll around. To remove the highlighting, press the pin button again and the highlights will go away.
) on the top right of the cell to keep the highlights in place while you scroll around. To remove the highlighting, press the pin button again and the highlights will go away.
Things to note:
- Only one value can be highlighted at a time.
- Highlights will stay if you paginate through data that is spread across multiple pages.
- The pin button is only visible when you hover in over a cell.
2. Finding out other users coming from an IP address
Often a checkuser investigation is recursive, meaning that the checkuser will perform a check for a username and then perform a check for the IP address(es) for that username and then look into other accounts turned up by that and so on. To make this simpler, there are two new options:
- When you click the ellipsis (
 ) button on a username cell, there is an option to Mostrar todos os IPs deste usuário. This option will add activity of that user from other IPs to the table.
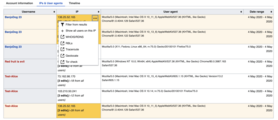
 - When you click the ellipsis button on an IP cell, there is an option to Mostrar todos os usuários neste IP. Clicking this will add all other activity (from registered and unregistered users) to the table.
-
Mostrar todos os usuários neste IP will add all other users using that IP address to the table
-
Mostrar todos os IPs deste usuário will add all other IPs being used by this user to the table
-
Screenshot of the table after the Mostrar todos os usuários neste IP was clicked
Note that there will be a new log record created in the checkuser log when either of these options is clicked. The Reason for the log will be the same as in the initial form.
3. Copy wikitext of the table contents

At the bottom of this page, there is an option to copy the wikitext for the table. This is helpful when a case needs to be logged on checkuser wiki.
4. Filter through the data to remove users who are not sock accounts

There are two ways to filter through the data:
- As you go through the data and discover users that may not be sockpuppets, you can filter them out using the Ocultar os seguintes usuários ou IPs option on the top. This will reduce the amount of data you see and make it easier to compare users.
- Another way to narrow down the data would be to reduce the time duration for the data with the Duração filter option.
Timeline tab:

The Timeline tab is a new addition to the Checkuser tool. It offers an easy way to compare activities of two or more users. It lists new page creations, edits and log actions for all the users in chronological order of their activity. Using this feature, checkusers can find out if users are editing the same pages, making similar edits, or are active during the same times of the day. This helps make a judgement call about them being socks.
Blocking:

The new Special:Investigate page has a completely new way to block users. It uses the same basic form as Special:Block does, to maintain familiarity for checkusers and also standardize the code to make it easier to manage.
Users can select IPs and users to block and then they can go to a new block page to select specialized block options, per the existing Checkuser form.
Notices can be added either at the top (prepend) or bottom (append) of a user or talk page, or can replace the contents of the page.


